Welcome back to DeFi for Dummies. This edition is on Hercules protocol; one of the projects on Metis with the most in depth options for #DeFi#. If you’re new to DeFi we would recommend checking out our DeFi for Dummies: Introduction article.
Also, if you missed it, earlier this week we released our DeFi for Dummies edition on the DeFi Kingdoms game.
What the hell is Hercules?
Hercules a decentralized exchange (#DEX#) on the Metis network. At time of writing Hercules boasts the deepest #liquidity# on the Metis network for almost all pairs.
Hercules is first and foremost an exchange, allowing quick and easy swaps between dozens of tokens. In addition to this they offer an expanding list of more advanced DeFi tools.
Basically, if you’re looking to do DeFi on Metis, Hercules is probably where you want to start your research.
You can check out the Hercules website, their dApp, or their docs for more info.
What makes Hercules different?
What exactly sets Hercules apart? For a start, (and again this should not be construed as a recommendation) Hercules has shown a great willingness to be a part of the community. Since their launch they have been active in the ecosystem, partnering with other projects, promoting content, and engaging with users. This isn’t necessarily an indication that this will continue, but so far, so good. Now onto the tech.
Hercules Liquidity
At its core Hercules offers two liquidity systems similar to Uniswap’s V2 and V3 systems. If you have no idea what these are we would recommend you check out our DeFi for Dummies: What is liquidity? article.
Hercules have made some modifications to these existing systems in order to offer projects more options when creating their pools. In brief these are:
spNFTs
spNFTs are a type of #NFT# (see Altcoins, tokens, and more article for further info) that represent a liquidity position. Hercules has done this to add “composability” to their liquidity positions. This is basically a fancy way of saying they’re easier for other protocols to interact with.
Not all liquidity positions on Hercules are spNFTs, but certain DeFi options on the protocol require the use of one, such as Nitro pools.
Stablepools
In addition to traditional V2 pools, Hercules allows for the creation of “stablepools”. These are solely for #stablecoin# pairs. These pools use a slightly more complicated formula than the usual V2 x * y = k (seriously, go read the liquidity article).
Instead they use x^3*y+y^3*x=k
We aren’t going to do an example for this one, but the upshot is this formula helps prevent slippage when trading stablecoins, even on very large trades.
This is obviously very useful when one expects the underlying assets to retain a constant value in the wider web3 landscape. For instance, whilst Hercules might have the deepest #USDC# pool on Metis, it is tiny compared to all the USDC pools across all chains. You wouldn’t want a single large trade making it worth less than a dollar.
Hercules offers a detailed breakdown of stablepools here.
Custom and directional fees
Hercules introduces customizable and directional fees in both its V2 and V3 liquidity models, allowing for more dynamic and tailored fee structures.
Fees can be set specifically for each liquidity pool, but Hercules adds the ability to adjust fees dynamically based on market conditions. So, for instance, there can be lower fees when the market is slower to encourage use, and higher fees when there is more volume.
Directional fees can be applied to account for the direction of the trade – buying vs. selling. For example, higher fees can be applied to a token during increased market volatility or larger price swings to protect liquidity providers from suffering as much from #impermanent loss# (if you don’t know what impermanent loss is, make sure to check out our DeFi for Dummies: Liquidity article).
The customization of the fee structures is obviously great for both projects and, in theory, liquidity providers. Traders also benefit when the market is slower, though may end up paying more when they most want to trade tokens.
Hercules reward system
Hercules have structured their reward system to encourage long term participation. They have done this by offering a large portion of their incentives in new tokens xTorch and xMetis. We dive into both of these more below, but in short they require long #vesting# periods in order to extract the most liquid value from them.
In the case of xTorch, however, users can instead utilize them to generate further rewards. This, in theory (and so far in practice), encourages users to stick around rather than immediately #dumping# their reward tokens.
Additionally the vesting system allows for the protocol to potentially redistribute rewards to more patient holders, as when users who opt for shorter vesting periods part of their rewards either go back to the protocol (in the case of xMETIS) or are #burned#, potentially driving up token price (in the case of xTORCH).
Hercules’ project friendly features
Hercules has stated throughout their marketing material a desire to empower projects working with them. They do this in a couple ways:
Customizable Liqudity.
As mentioned above, Hercules has stated a willingness to work with teams in order to set up their liquidity pools in a way that works for them.
We cannot currently confirm the truth behind this commitment, but as we will shortly be re-launching our own token we will update this when we have hands-on experience.
Swap Referral
Hercules also advertises a “swap-referral” mechanism. This allows projects to create their own swap dApp using Hercules as the technology underneath. So for instance, a project might want to allow people to swap for their token directly on their own website, but do not want to create their own mini-dex to do this.
By allowing projects to share in the rewards of swaps generated by their own promotional material Hercules allows liquidity pools to stay deeper (rather than having multiple smaller liquidity pools) whilst also ensuring projects don’t feel they are missing out.
TORCH vs xTORCH
Hercules has two related tokens that are native to its platform – TORCH and xTORCH.
TORCH is the native token of Hercules. Designed to be liquid and tradeable.
Torch has a max supply of 10,000,000 which will be reached over a 3 year period. Users can earn TORCH from the incentives Hercules provides in their farms and Nitro Pools.
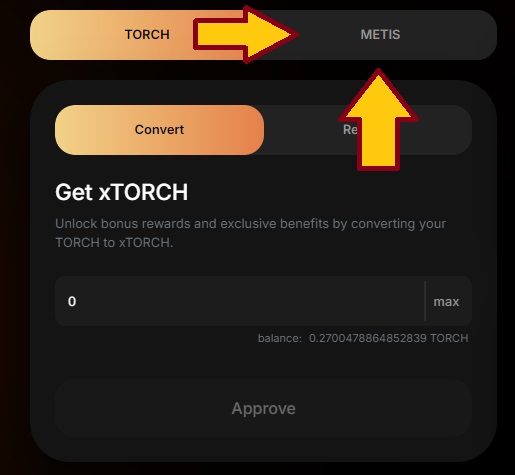
xTORCH is what Hercules calls their “Utility Rich” token. This is essentially an escrowed version of TORCH and unlocks features of the platform. xTORCH is illiquid and cannot be bought, sold, or transferred. It can however be used to access rewards on the Hercules platform (see DeFi option: Using xTORCH below).
TORCH can always be instantly traded on a 1:1 basis for xTORCH, allowing you to access the platforms DeFi rewards. Changing xTORCH back to TORCH however takes between 15 days and 6 months, depending on how much you hope to redeem. You can read more on this below in the Redeeming Hercules Rewards section.
For more on tokens in general, you can check out Crypto tokens: Altcoins, shitcoins and more
DeFi option: Providing liquidity
So the first form of DeFi offered by Hercules is liquidity provision. If you have no or limited understanding of what liquidity is, we’d recommend reading DeFi for Dummies: Liquidity first. Particularly surrounding the dangers of impermanent loss and other risks associated with different types of liquidity.
Hercules offer multiple types of liquidity pools:
Hercules V2 Pools:
As you’ll already know from reading the recommended liquidity articleLINK, V2 positions are spread liquidity. Your liquidity is available for trades at any price range of both assets. V2 pools are useful for projects that expect (or even desire) volatile price movement.
In terms of being a liquidity provider, the rewards tend to be much lower in V2 pools. However you might prefer to participate in a V2 pool for a few reasons:
- The asset you wish to provide liquidity for only offers V2 LP.
- A V2 pool is incentivized by the project itself.
- You want to provide LP in more of a “set and forget” fashion (V3 positions require closer monitoring.
Hercules V3 Pools:
With V3 pools, you choose what range you want your liquidity to be active in. The narrower the range, the more “concentrated” your liquidity is, which means you enjoy a higher percentage of the fees when trading in that range.
It is important to understand that when providing a liquidity range you are more susceptible to #impermanent loss# (IL) when there are sudden price movements. The extreme example of this is if the price moves out of your range. For instance:
Let’s say $VESTA was worth $2000 each (we wish). You are providing liquidity for it in a VESTA-USDC pool, with a range of $1500 – $2500. If the price of $VESTA went to $2800 then because of your range your position would now be entirely USDC. You would therefore lose out on the price gain of the token beyond your range entirely. Whilst in this situation you would still suffer IL using a V2 pool, the effect would not be as much.
As always; ensure you have a very good understanding of the risks of DeFi before committing your funds. No one will be able to help you if you get #rekt#.
We would say V3 pools are more suitable for individuals who:
- Have a very good understanding of DeFi mechanics and risks.
- Are able to frequently check and manage their position.
- Are familiar with the assets they are pooling and the likely price shifts.
Nitro pools
Nitro pools are special V3 pools that users can join by staking their spNFT (see above in What makes Hercules different) for the relevant position. Nitro pools are time limited pools that are incentivized in addition to the usual yield. They are a way of encouraging users to provide longer term liquidity in particular pairings; either by Hercules themselves, or by a project hosting their liquidity there.
They can be set up by anyone and can have a host of requirements for participation, including a minimum amount of time you need to join the pool.
V3 Vaults
The final liquidity option is Hercules’ V3 vaults. These are managed strategies set up by external providers, designed to optimise your liquidity position automatically.
This provides more of a “set and forget” option for those who wish to provide V3 liquidity, but don’t want to manage it themselves as actively.
Currently Hercules offers vaults managed by both Steer and Gamma. As this is not an article about either of these companies we can make no comment on how effective these strategies are.
If V3 vaults sound like something you’re interested in, we would recommend looking into the companies themselves, the strategies used, and speaking to others who have taken part in the vaults.
Choosing a liquidity pool
We aren’t going to tell you what to choose, or whether to choose any at all. For a start they’re constantly changing in terms of rewards and risk. What we are going to do is show you how you can gather your own information and give you this piece of advise:
Often when rewards are very high, so is the risk involved. Make sure you understand where rewards come from, what the risks are, and how you might get #rekt#.
Understanding Hercules’ liquidity rewards
Hercules uses multiple rewards for its various liquidity pools,three to be precise. Here is what they mean.
Trade fees:
These are fees from trade fees. 80% of the trade fees for V3 pools and 60% for V2 pools goes to the people providing the liquidity. This is generally shown as an #APR# which is estimated based on recent activity.
These are paid in a liquidity token for the pair you are providing liquidity in.
Farm yield/farm apr
Farm yield is available on most nitropools and vaults. They are extra incentives to provide long term liquidity on hercules. They are primarily provided by Hercules themselves in the form of xTORCH and xMETIS.
Nitro rewards
Nitro rewards are extra rewards, generally provided by either Hercules themselves or alternatively the project who’s token is in the pool, designed to incentivize people to provide liquidity to the pool. These are paid in whatever token the user has incentivized the pool with.
Finding info on pools and vaults
The place to start looking is, unsurprisingly, in the “earn” menu on Hercules. There are two pages that interest us here: “pools” and “nitro pools”.
Pools page:
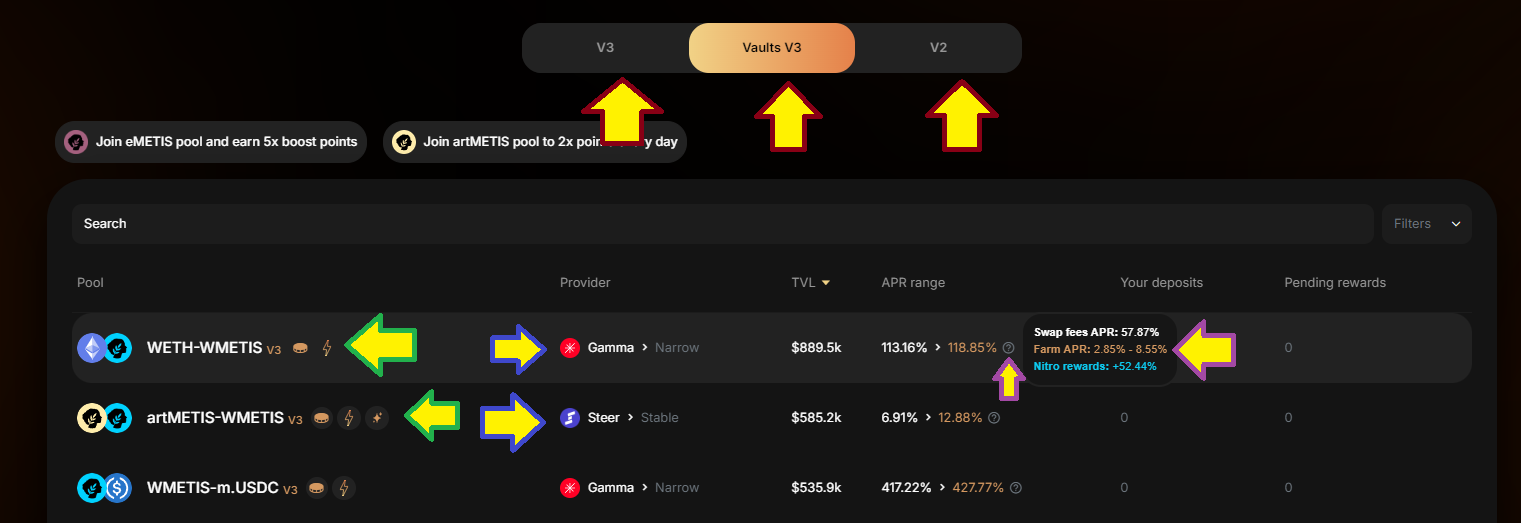
The pools page (on the V3 Vaults tab) looks like the image below
Here we have:
- Tabs to select what type of pool you wish to look at (red arrows)
- The token pairs for each vault. Next to it you have icons that show a quick reference for which rewards type it receives (you can hover over them for more info) (green arrows)
- The provider of the Vault strategy. At time of writing this will always be either Gamma or Steer. (blue arrows)
- Next to the apr range you’ll find an info icon, if you hover over it you’ll get a breakdown of how much of each reward type you’ll receive. (purple arrows)
The other two tabs will have similar but much less information.
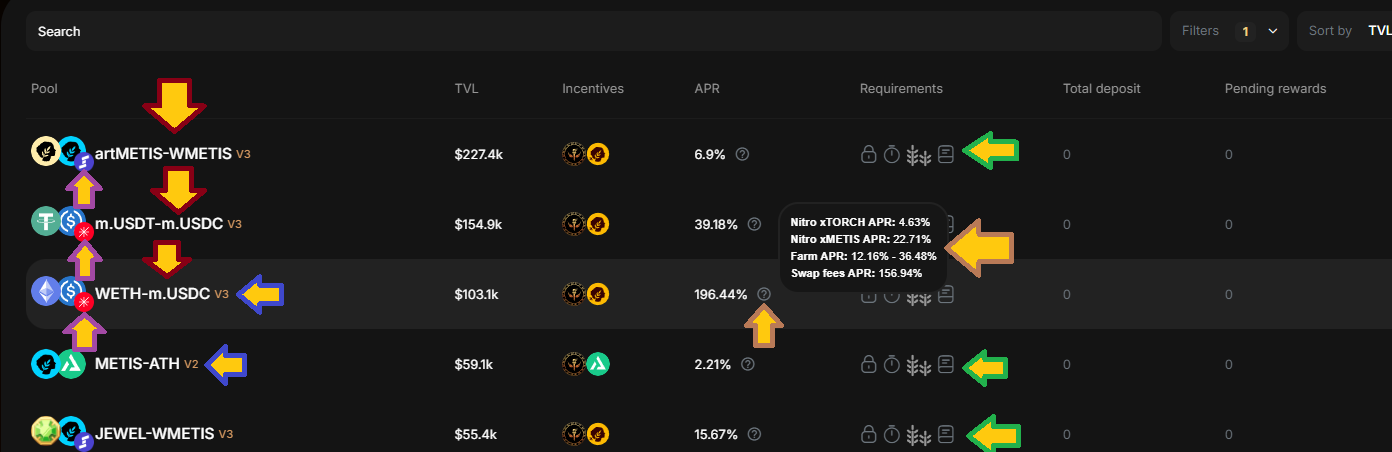
Nitro pools page:
The Nitro pools page looks like the below. The important bits here are:
- The token pairs required to join the nitro pool (red arrows)
- Whether the pool is for V2 or V3 liquidity (blue arrows)
- If the pool is V3 then it will indicate whether you need to use a strategy by Steer or Gamma (purple arrows).
- Next to the apr range you’ll find an info icon, if you hover over it you’ll get a breakdown of how much of each reward type you’ll receive. Because nitro rewards can be basically any token, this section will also tell you how much of the nitro reward is in each token. (brown arrows)
- Whether the pool has any requirements such as lock time or LP amount. If they are greyed out then they are not a requirement – for instance none of the pools in the image have any requirements to join. (green arrows)
How to provide liquidity on Hercules
This how-to will cover how to provide all types of liquidity on Hercules, without going into too much detail on each type. If you’d like an even more detailed breakdown on a specific one, Hercules offers comprehensive guides within their docs for V2, V3, and spNFTs.
Once again, these are simply instructions on how to do this, not a suggestion that you do.
Creating an LP pair
The first thing you’ll need to do is create an LP pair. You’ll need to be on the Hercules dApp and have the wallet you want to use connected.
Before you make a pair, we would advise you read this entire guide as you’ll likely want to know what pool you want to farm before you create a random pair. You’ll also need the relevant tokens, for a V2 pair this will be a 50/50 dollar value split, for V3 you’ll likely want to simply get the settings you want for your pair and then swap the relevant values.
Your first stop is the add liquidity page. You can find this by going to Trade -> Add Liquidity using the menu or by going here.
At the top of the page you’ll be able to select whether you want to create an V2 or V3 pair using the orange tabs (the writer for some reason is totally blind to these).

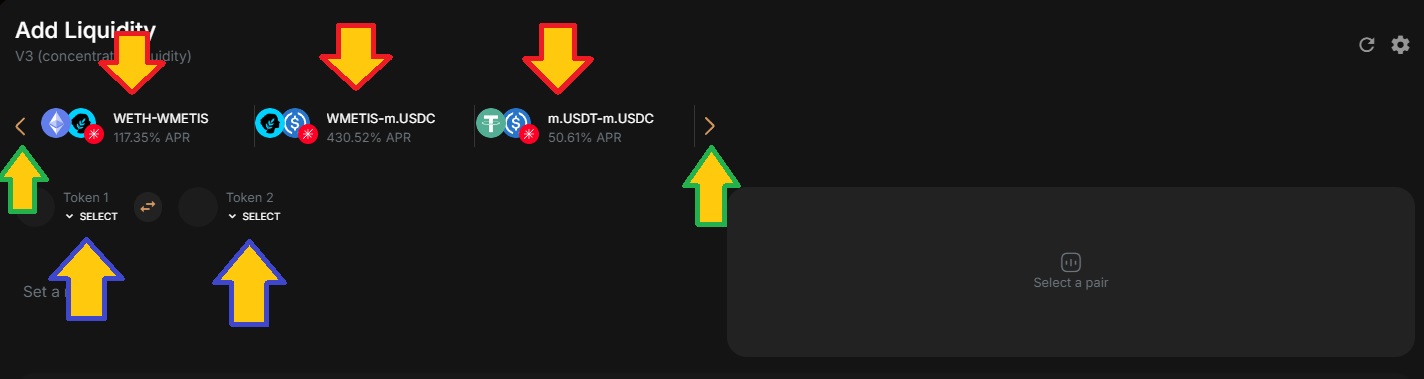
Creating a V3 pair
On the V3 screen you’ll be looking at something like the below. Here we have:
- Some of the available vault strategies – red arrows (see above section on liquidity)
- You can scroll through additional vault strategies by using the orange arrows (confusingly highlighted with the green arrows below)
- Token selection menus – blue arrows
If you wish to use a V3 Vault, and your strategy is listed here, then you can select it now. Alternatively you will also be able to select it a bit later for whatever pair you wish to use (if available).
If you wish to manually create a V3 position (Hercules recommends this only for advanced users) then you will need to choose your token pair using the drop downs next to the blue arrows.
Note: If you wish to enter a V3 Nitro Pool, you will need to use a Vault rather than manual.
Manual V3 position
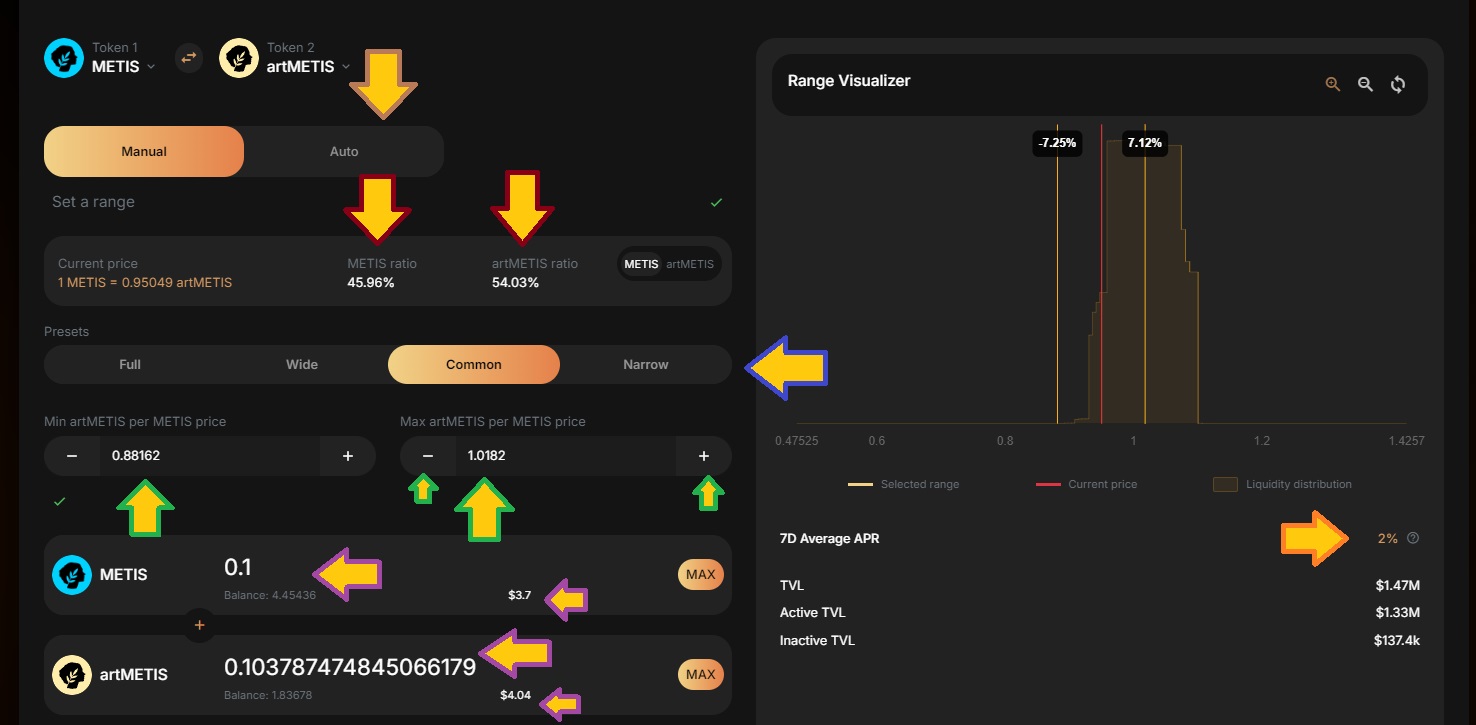
If you wish to continue with manual you’ll need to select the two tokens you wish to pair. Once you do you’ll have a screen like the one below. On this screen we have:
- The ratio of each token required given your settings (red arrow)
- The preset options for selecting your liquidity range (blue arrow)
- Options to manually set your own custom range, overriding presets (green arrows)
- The amount of each token you’d like to add, filling in one will autofill the other (purple arrows)
- The trading fees APR (does not include other rewards) based on an average of the last 7 days of trading (orange arrow)
- The option to switch to Vault strategies for the selected pair (brown arrow)
Once you have the settings as you like them, you’ll need to approve both tokens (if you haven’t previously) and then sign another transaction to “Add Liquidity”.
Creating an Auto V3 vault position
To create a vault position you can either enter the token pair manually as in the section above and then switch to “auto” or you can find the vault you’d like to join (see Choosing a liquidity pool section), click on the desired vault, and then hit “add position” at the bottom of the page. We would recommend the second option as it guarantees that you’ll be joining the vault you want to.
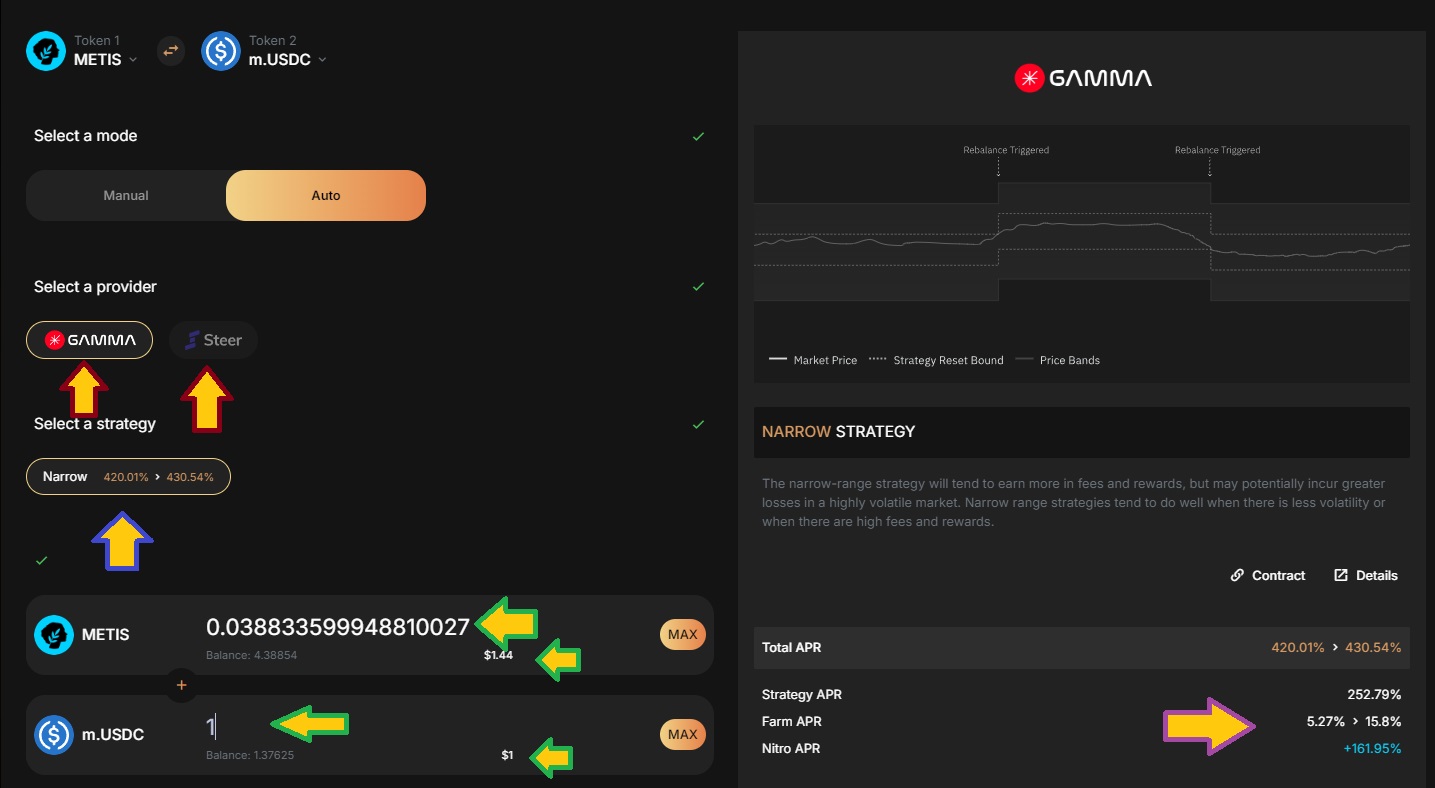
However you get there, you’ll find a screen like the one below. Here you’ll have:
- The provider options, in this instance there’s more than one you can choose from. (red arrows)
- The strategy, often there will only be one, but if a provider provides multiple strategies they will be listed here. (blue arrows)
- The amount of each token you’d like to add, filling in one will autofill the other (green arrows)
- The rewards for the pool (See Understanding rewards in the Choosing a liquidity pool section). Note also that the nitro APR only applies if you join the nitro pool, and some vaults do not have a corresponding nitro pool, although most do. . (purple arrow)
Once you are happy with the size and settings for your position you’ll need to hit Create Position.
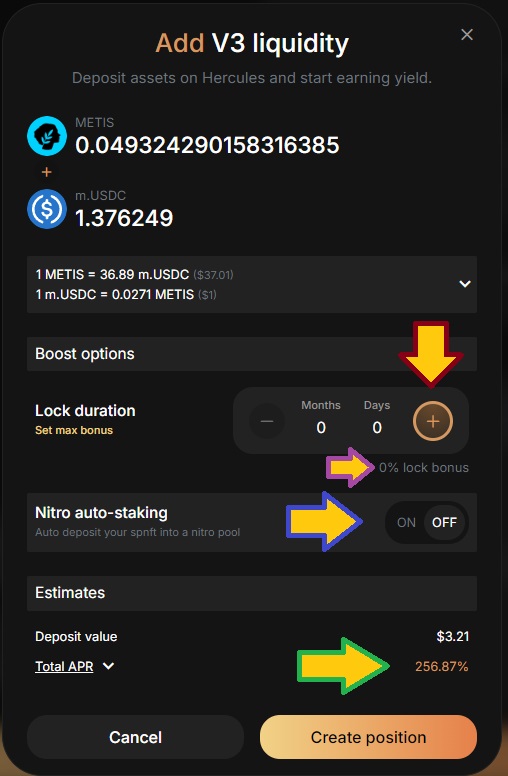
You will then get a screen like the below. Here we have:
- The option to select how long you wish to lock your position. Locking your position gives you a boost to your reward, and the longer you lock it (up to 6 months), the bigger the boost. (red arrow)
- The lock bonus given your current settings (purple arrow)
- The option to automatically stake the position in the related nitro pool; if your plan is to join the nitro pool then do this. (blue arrow)
- Your total estimated #APR#. Note that this automatically takes into account your lock bonus. (green arrow)
Finally, hit create position and you’re all set.
Adding V2 liquidity
To add V2 liquidity you’ll again navigate to Trade -> Add Liquidity on the menu (or click here) and this time select the V2 option using the orange tabs.

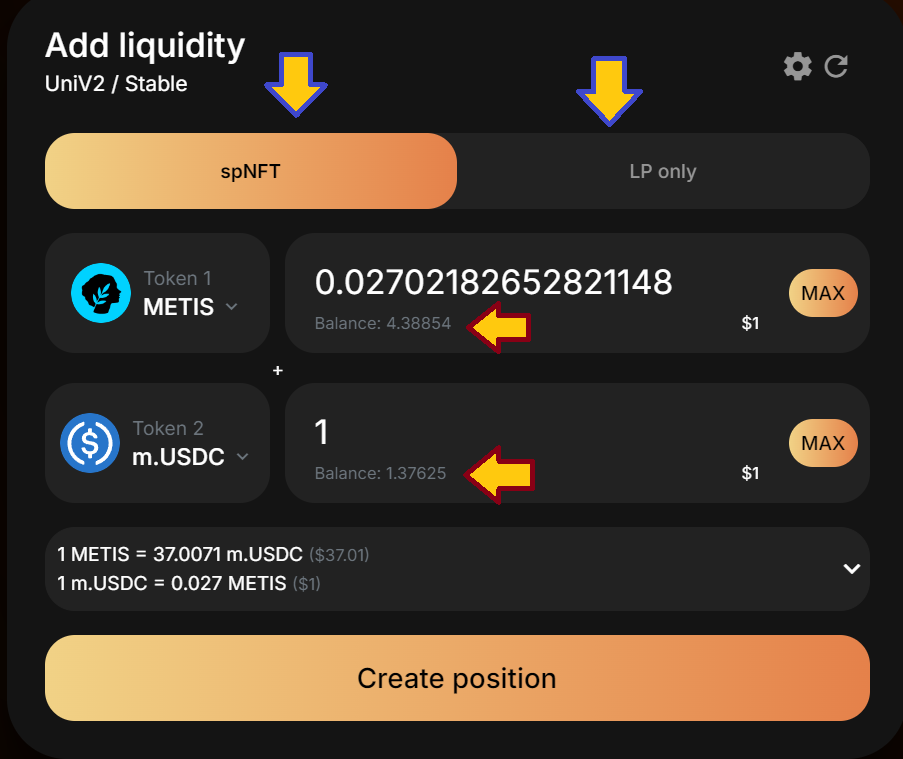
You’ll get a screen like the one below. Setting up V2 liquidity is quite straightforward so there’s only a few options.
- The amount of each token. These will be the same dollar amount and filling in one will auto update the other. (red arrows)
- Whether you wish to create it as an spNFT (see What makes Hercules different section.) If you do wish to make an spNFT then it makes sense to do it at this stage, you’ll be presented with options for spNFTs this token pair is compatible with, though it’s usually only one. (blue arrows)
Once you’re happy with your amount and spNFT settings you’ll need to approve the tokens (unless you previously have) and then hit Create position.
You will then get a screen like the below. Here we have:
- The option to select how long you wish to lock your position. Locking your position gives you a boost to your reward, and the longer you lock it (up to 6 months), the bigger the boost. (red arrow)
- The lock bonus given your current settings (purple arrow)
- The option to automatically stake the position in the related nitro pool; if your plan is to join the nitro pool then do this. (blue arrow)
- Your total estimated #APR#. Note that this automatically takes into account your lock bonus. (green arrow)
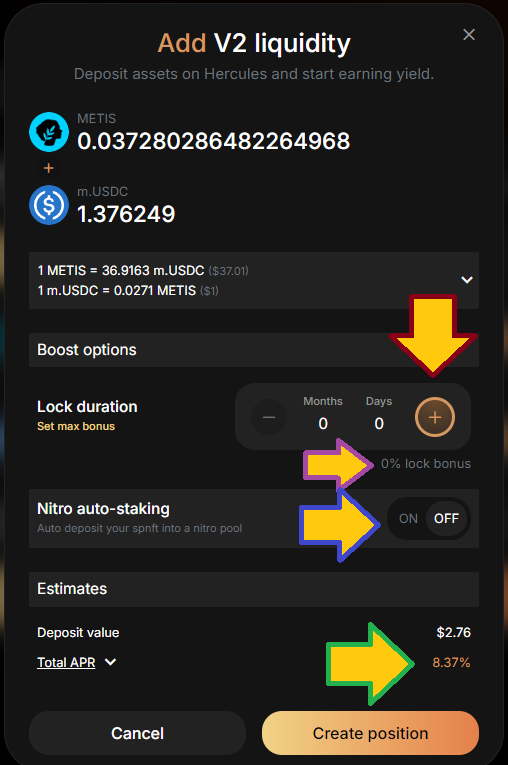
Once you’re happy with your settings hit “Create position”, sign the transaction, and you’re done.
Collecting rewards
To collect rewards for your positions you’ll need to first find them.You’ll want to go to the menu and go to Earn -> Positions or click here.
At the top you’ll have a tab for each type of position.

If you can’t find something, it is worth checking all of these as it can get a little confusing. For instance, if you have wrapped your Vault position or V2 position as an spNFT, then it will appear under the spNFTs tab.
Collecting spNFT rewards
- Click on the spNFT in question.
- You’ll get a pop up with a “Harvest” button at the bottom – hit that.
- You’ll be given the option to harvest just your nitro rewards or all rewards at once.
Collecting LP V3 rewards
- Go to the LP V3 tab and click on the position.
- This will expand the selection and you’ll be presented with a “Harvest” button.
The V3 Vaults tab
- Many of these are only rewarded in the relevant liquidity pair. These rewards are automatically added to your position without you having to do anything.
- For V2 pairs that also have farming rewards, you’ll need to navigate back to the pools page (see above) and find the pool in question.
- Once you have found it, click on the pool and it will open the pool page. This will show you your farming rewards with a Harvest button.
Collecting LP V2 rewards
These are collected in the same way as the Vaults V3 rewards, including with farming pairs.
Removing liquidity/closing positions
Let’s start with the most common types of positions and work backward.
Closing spNFTs
1. Go to Earn -> Positions on the menu or click here.
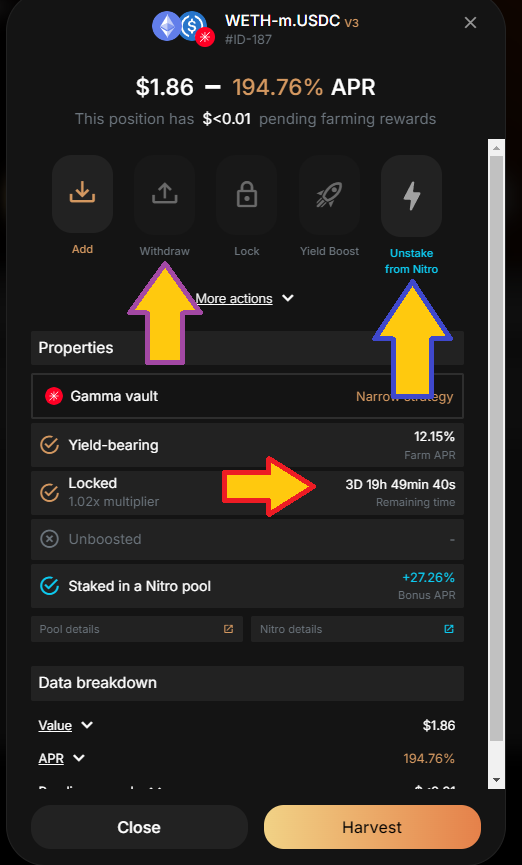
2. Click on the position you want to close. You’ll then get the screen below.
3. You’ll only be able to withdraw the position if any lock timer you set has already expired. (red arrow)
4. If the position is staked in a nitro pool, you’ll also need to unstake it. (blue arrow).
5. Then you’ll need to withdraw the position. (purple arrow)
6. When you withdraw, the option to “auto-unbind” the assets will be selected as default. If you leave this on it will destroy the liquidity pair, and leave you with the component tokens. This is generally be your desired outcome.
Closing LP V3 positions
- To close an LP V3 position navigate to the LP V3 tab of the positions page.
- Click on the position you wish to close, this will expand downwards.
- Find the “unbind” button.
- This will bring up a box where you can choose how much of your position to get rid of. The “burn position” toggle simply destroys any spNFT associated with it (so that it doesn’t clog your wallet). It is only available if you are unbinding your entire position so you can safely have it on or not as you wish.
Closing Vault V3 positions
If you’d like to move the funds into something else then you’ll need to unbind your position.
- On the menu go to Earn -> Positions or alternatively go here.
- Using the tabs you’ll want to select Vaults V3 (red arrow in image below)
- Click on the minus symbol on the right (blue arrow in image below)
- You’ll then select how much you wish to unbind and be given a breakdown of what tokens will go to your wallet.
- Hit unbind and sign the transaction.

Closing LP V2 positions
These are closed in the exact same way as the Vaults V3 positions above.
DeFi option: Using xTorch
There are currently three ways to use your xTorch on Hercules; Dividends, yield-boosting, and staking on their launchpad. The first two of these definitely fall within the realms of DeFi, the last one not so much but we’ll give a quick run down on it anyway.
Note: There is a 0.5% fee for unstaking xTorch from any of these plugins. This should be a consideration, especially if you plan to jump from one to another.
Dividends
Currently by far the most popular use of xTorch is to stake it in the Hercules dividends pool. The dividends pool is designed to share protocol earnings with stakers of xTorch. Protocol earnings are accrued from transaction fees whenever someone swaps tokens using Hercules. Depending which pool the swap occurs in impacts how much of the fee goes to the dividends pool.
At time of writing the breakdown was as follows:
V3 pools: 7% of transaction fees go to dividends.
V3 vaults: 4% of transaction fees go to dividends.
V2 pools: 21.5% of transaction fees go to dividends.
Currently in addition to this the rewards pools are being incentivized to encourage participation until volume increases.. This epoch for instance includes an additional 1,370 xTorch and 32 xMetis as shown below.

The WMETIS-m.USDC portion is what the current protocol earnings are. This will obviously fluctuate depending on how much the protocol is used.
How fees are distributed:
Fees are distributed in “epochs”; basically a fancy word for a period of time. In the case of Hercules dividends it’s a week. A certain number of tokens are allocated to the current “epoch” based on protocol earnings and any incentives active at the time.
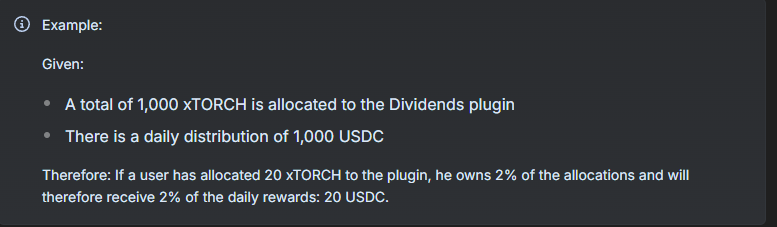
Anyone staking in the dividend plug-in will receive rewards proportional to their share of the total pool. Hercules offer a very handy example in their docs.
Rewards are distributed evenly throughout the week, you don’t need to wait until the end of the week or “epoch” in order to claim them. This is particularly useful if you’re looking to #compound# your gains.
How to stake in the dividends pool:
- Connect your wallet
- First you’ll need some xTorch; you can find out how to get xTorch in the TORCH vs, xTORCH section above.
- Go to the dividends page. You can find it using the menu and going to Dashboard -> Dividends or by clicking here.
- Hit allocate, select how much xTorch you want to stake, and hit allocate again.
- Sign the transaction and you’re done!
You’ll be able to see your position on the dashboard page above the allocate button. This should tell you how many tokens you have allocated, what share of the dividends you’ll receive, your “manual allocation” and your “redeem allocation”.
Manual allocation is the amount you’ve chosen to allocate yourself. Redeem allocation is equal to half of any xTorch tokens you are in the process of redeeming (as explained in the Redeeming Hercules rewards section below.
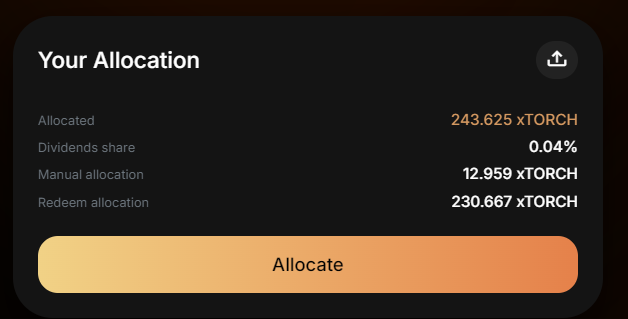
In the example above the user has 243.625 xTorch staked which is 0.04% of the total pool; they will receive 0.04% of the epochs rewards assuming no changes to the staking pool total.
12.959 of their allocation is manual, the rest is made up of 50% of the total amount (461.33) xTorch that they are currently redeeming.
Claiming Rewards:
Below the current epoch rewards on the dividends page, you’ll see your “Pending rewards.” This will show all currently outstanding rewards you have available. You can claim these either individually or via the “Claim All” button. We would recommend the latter.
Any xTorch you redeem will be immediately usable; you can stake in the dividends pool, another plugin, or redeem it. The other two tokens currently offered (xMetis and WMETIS-m.USDC) are a bit different. You can read about interacting with these in the Redeeming Hercules rewards section below.
Yield Boosting
Yield boosting is the second potential way to use your xTorch in order to maximise your DeFi rewards from Hercules. We are going to be brief on this it is only particularly worthwhile for those who already have large LP positions in pools that offer farming yield (see Understanding Hercules’ Liquidity rewards in the Choosing a liquidity pool section above ).
Yield Boosting only impacts your farm rewards (not trading fees or nitro incentives). At time of writing, for most users, the incentives to join the dividends pool are much higher.
If you do wish to see if Yield Boosting is for you, you can find the yield boost plugin under Dashboard -> YieldBooster or by clicking here.
You then need to select the position you wish to boost, and hit the “+” sign next to it.
The pop-up will give you information on what impact the yield boost will have on your APR of that position. You can use the “max boost” button in order to automatically assign the amount required.
Hercules Launchpad
A launchpad is a way in which new projects can launch their token. It allows them to generate initial capital and ensure a smooth launch by using an established system.
In turn, holders of the launchpads token get an opportunity to purchase a new token at before it hits the open market, often at a discounted rate compared to the launch price.
The tokens they buy are generally released partially on the launch of the project at the Token Generation Event (#TGE#), with the rest being released over the following months or years.
Hercules has included a launchpad as part of its protocol but, with xTORCH being the qualifying token to participate. At time of writing, however, there are no projects set to launch imminently.
We would advise waiting for news on an upcoming project before staking any xTORCH with their launchpad.
Redeeming Hercules rewards
xMetis
xMETIS is a token that represents an amount of Metis held by Hercules in “escrow”. xMETIS can be converted into METIS through the Hercules redeem feature on their dashboard. This is done through #vesting# your xMETIS for between 15 day and 6 months.
How long you “vest” will determine how much METIS you receive. Currently the amount of METIS per xMETIS is on a scale of 0.5 (15 days vesting) to 1 (6 months).
So if you have 10 xMETIS and vest for 15 days you’ll receive 5 METIS. If you vested10 xMETIS for 6 months you’d receive 10 METIS.
Here’s how you can do it:
- Go to Hercules dashboard by using the menu and going Dashboard -> Dashboard or alternatively by going here.
- Using the redeem plugin on this page select the METIS tab at the top:
- Select how much of your xMETIS you wish to redeem. If you plan to vest for the maximum amount of time there is no reason we know of not to select the maximum amount of xMETIS.
- Select the amount of time you wish to vest for, the minimum of 15 days will be in by standard. If you wish to vest for the maximum amount of time there’s a handy “Set max” button.
- Hit redeem and sign the transaction. You’ll be able to see your vesting xMETIS below and how long it has left,
xTORCH
xTORCH is redeemed in the exact same way as xMETIS only using the xTORCH tab. The main difference is that you still get some utility from your xTORCH even as you redeem it. Half the value of the xTORCH you are waiting to redeem is treated as if it were staked in the dividends plugin – see the DeFi option: Using xTorch section under the heading Dividends.
WMETIS-m.USDC
This is rewarded as part of the dividends program and represents a liquidity position that is given as a reward. The first step to using this is finding it, which is a little less intuitive than we would like.
Finding your reward LP:
- On the menu go to Earn -> Positions or alternatively go here.
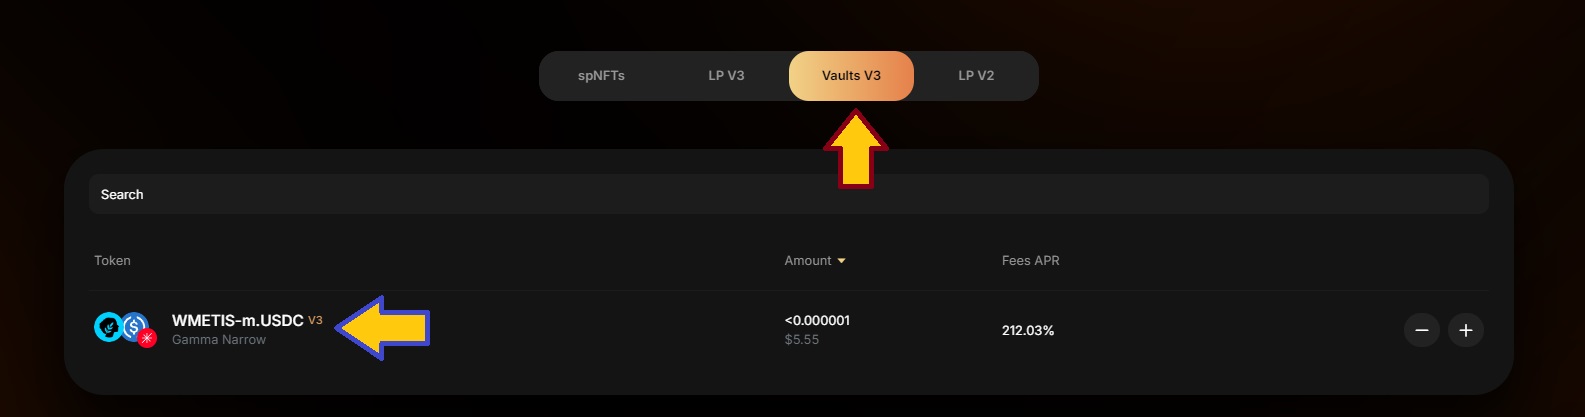
- Using the tabs you’ll want to select Vaults V3 (red arrow in image below)
- Your WMETIS-m.USDC position should be listed here (blue arrow) along with any other Vaults positions you happen to hold.
Now that you’ve found your LP you have a few options for what to do with it.
Keeping it as liquidity
Your first option is to simply keep it as #liquidity#. You’ll notice that your position has an APR listed next to it, 212% in the image above. This interest is automatically added to your position as additional liquidity.
If you wish to earn even more from your reward as LP, you can earn extra APR through staking the position and locking it in a nitro pool. See the Providing Liquidity section below for details on how.
Withdrawing the tokens
If you just want the liquid tokens, you can withdraw them through the same mechanism as any Vault V3 liquidity pair. To find out how, check the Vault V3 part of the Removing liquidity/closing positions section.